In a form, you should provide instructions to the website user on how to complete each value properly, but you should also check the values that they enter. Blazor provides simple tools that can perform this validation with the minimum of custom code.
In this unit, you learn how to annotate models so that Blazor knows what data to expect. You also learn how to configure a form so it validates and responds to user data correctly.
Validate user input in Blazor forms
When you collect information from a website user, it’s important to check that it makes sense and is in the right form:
- For business reasons: Customer information such as a telephone number or order details must be correct to give good service to users. For example, if your webpage can spot a malformed telephone number as soon as the user enters it, you can prevent costly delays later.
- For technical reasons: If your code uses form input for calculations or other processing, incorrect input can cause errors and exceptions.
- For security reasons: Malicious users might try to inject code by exploiting input fields that aren’t checked.
Website users are familiar with validation rules that check for the presence and correct format of the details they enter. Required fields are often marked with an asterisk or a Required label. If they omit a value or enter a poorly formatted value, they see a validation message instructing them on how to correct the problem. The validation message might appear when the user tabs out of a field or when they select the Submit button.
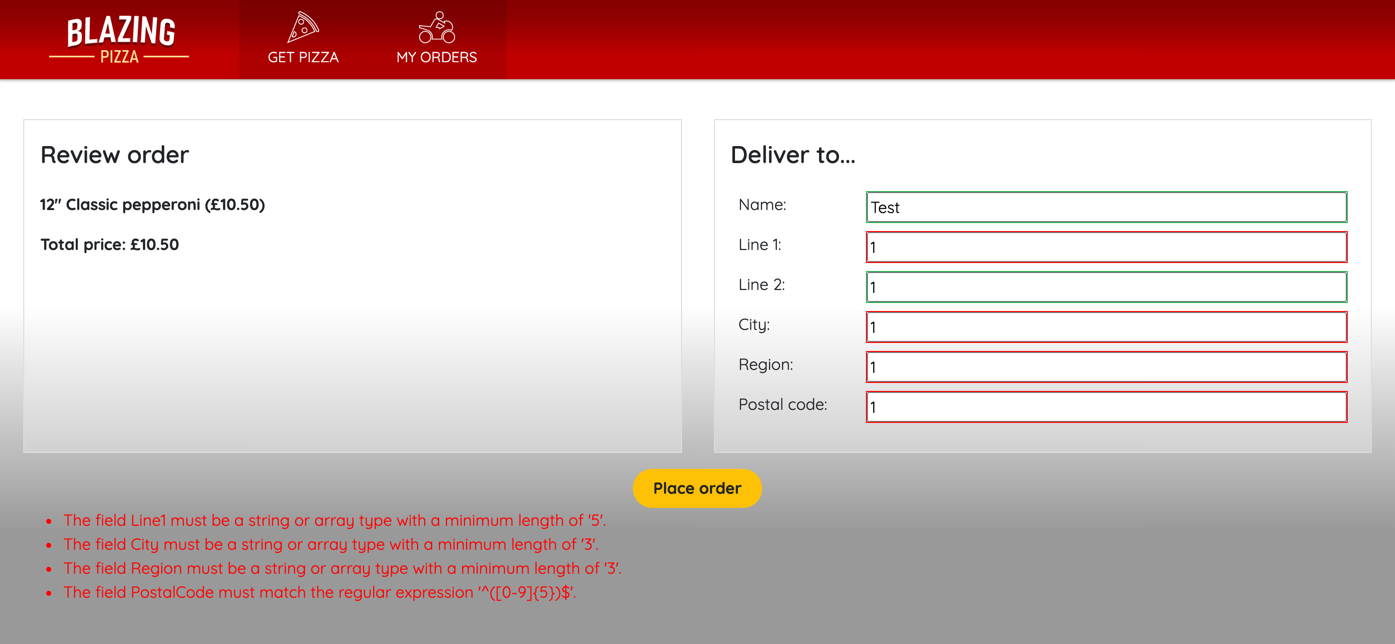
Here’s an example form where the user submits invalid data. In this case, there are validation messages at the bottom of the form and invalid fields are highlighted in red. You’ll build this form in the next exercise:
It’s a good idea to make validation messages as helpful as possible. Don’t assume any knowledge from the user; for example, not everyone knows the format of a valid email address.
When you use the EditForm component in Blazor, you have versatile validation options available without writing complex code:
- In your model, you can use data annotations against each property to tell Blazor when values are required and what format they should be in.
- Within your
EditFormcomponent, add the DataAnnotationsValidator component, which checks the model annotations against the user’s entered values. - Use the ValidationSummary component when you want to display a summary of all the validation messages in a submitted form.
- Use the ValidationMessage component when you want to display the validation message for a specific model property.
Prepare models for validation
Start by telling the DataAnnotationsValidator component what valid data looks like. You declare validation restrictions by using annotation attributes in your data model. Consider this example:
C#Copy
using  System.ComponentModel.DataAnnotations;

public class Pizza
{
    public int Id { get; set; }

    [Required]
    public string Name { get; set; }

    public string Description { get; set; }

    [EmailAddress]
    public string ChefEmail { get; set;}

    [Required]
    [Range(10.00, 25.00)]
    public decimal Price { get; set; }
}
We use this model in a form that enables Blazing Pizza personnel to add new pizzas to the menu. It includes the [Required] attribute to ensure that the Name and Price values are always completed. It also uses the [Range] attribute to check that the price entered is within a sensible range for a pizza. Finally, it uses the [EmailAddress] attribute to check the ChefEmail value entered is a valid email address.
azure training courses malaysia
Leave a Reply