Microsoft 365 brings together the best productivity solutions for you to stay connected, produce your best work and optimize performance, wherever you are. Whether you’re using a laptop or your mobile device, you can easily create impressive content, access important files, stay up-to-date, organized and collaborate with anyone from anywhere, anytime.
Category: Uncategorized
-
Integrate Adaptive Protection with DLP
Adaptive Protection in Microsoft Purview works alongside Microsoft Purview Insider Risk Management to automatically adjust data loss prevention (DLP) policies based on user behavior. This adaptive approach ensures that data protection evolves as risk levels associated with specific users change.
When Insider Risk Management identifies risky behaviors, Adaptive Protection assigns users to a risk level, Minor, Moderate, or Elevated. Based on these assignments, DLP policies dynamically apply stricter controls for higher-risk users, such as blocking data transfers, while more lenient policies are applied for lower-risk users. As risk levels shift, policies update accordingly.
How Adaptive Protection works
- Dynamic risk levels: Users are assigned a risk level based on their behavior, which updates automatically as new information about their actions emerges.
- DLP policy integration: Adaptive Protection adds the Insider risk level for Adaptive Protection is condition to DLP policies. This allows DLP rules to apply different protections for users based on their risk level in services such as Exchange Online, Teams, and Devices.
Configure Adaptive Protection policies
Before you can create DLP policies using Adaptive Protection, you must enable it within Insider Risk Management. This integration ensures DLP policies can adapt dynamically to changing user risk levels.
-
Actions taken by the policy
Actions define how a DLP policy responds to policy violations. These actions can range from passive monitoring to full enforcement:
- Allow: The action is allowed but logged for auditing purposes. This is only available for device-scoped policies.
- Audit only: The action is allowed, but the event logged. This lets you collect data without disrupting workflows and can include alerts and notifications to help train users.
- Block with override: The user’s action is blocked, but they can override it by providing a justification. This can help you identify false positives during policy refinement.
- Block: The action is fully blocked, and users can’t proceed. Alerts and notifications are generated to inform administrators of the violation.
By starting with actions like Audit only and gradually moving toward more restrictive actions like Block with override or Block, you can tune policies without disrupting daily operations.
Understand simulation mode
Simulation mode allows you to see how a DLP policy would behave in your environment without fully enforcing it. This mode runs as if the policy were fully deployed, but no actions are taken, so there’s no effect on user activity or business processes. Unlike previous Test modes, all simulated results are reported in a dedicated dashboard, giving you full visibility into the policy’s potential effect.
Why use simulation mode?
- Test the effect of the policy: Simulation mode shows which items would be flagged if the policy were enforced, helping you evaluate the scope and effectiveness of the policy.
- Tune policies: Using the simulation results, you can adjust the conditions, actions, or scope of the policy to minimize false positives and ensure the policy aligns with business needs.
- Educate users: In simulation mode with policy tips, users are informed about risky behaviors without being blocked, raising awareness of compliance requirements.
-
Understand DLP policy deployment and simulation mode
Rushing a data loss prevention (DLP) deployment can lead to unintended consequences, such as blocking legitimate actions or generating false positives. This can frustrate users and lead to policy avoidance, which ultimately makes sensitive data less safe. Taking an incremental approach to deployment helps mitigate these risks while allowing you to collect data, tune the policy, and foster smoother adoption across the organization.
Three axes of DLP deployment management
When you deploy a DLP policy, three main factors need to be considered:
- State of the policy
- Scope of the policy
- Actions taken by the policy
Understanding how these factors work together is essential for deploying DLP policies that meet your security goals without disrupting productivity.
State of the policy
DLP policies can be set to different states depending on where they are in the deployment process. The state determines whether the policy is active, inactive, or running in simulation mode.
- Keep it off: The policy is inactive, and no data is monitored or actions taken. This state is useful when you’re still configuring or reviewing the policy.
- Run the policy in simulation mode: The policy monitors activity and records violations without enforcing any actions, allowing you to evaluate the policy’s effects without disrupting user workflows.
- Run the policy in simulation mode with policy tips: In addition to monitoring activity, this mode shows users warnings or tips when their actions would trigger the policy. It educates users on risky behaviors without blocking them.
- Turn it on right away: The policy is fully enforced, meaning all configured actions, like blocking or alerting, are applied.
Scope of the policy
The scope defines where the policy applies. You start by choosing locations like Exchange, SharePoint, Teams, or devices. By default, the policy covers all instances in that location. You can then include or exclude specific instances, like certain sites, users, or groups.
In simulation mode, you can test the policy without enforcing it, which lets you try out different scope settings. Before fully deploying the policy, you can apply it to a smaller pilot group to get feedback. Once you’re ready, you can apply the policy across all the locations you selected.
-
Design a DLP policy
Once you have a clear plan in place, it’s time to design your policies. The design process involves translating your business needs into specific configurations.
- Create a policy intent statement Each DLP policy should start with a clear intent. A policy intent statement outlines the purpose of the policy, the types of data it protects, and the actions it should take. For example:“This policy protects financial data stored in SharePoint and prevents it from being shared with external users.”
- Map business needs to policy configuration: After defining the intent, map your needs to specific DLP configurations. Key decisions include:
- What to monitor: Specify the type of sensitive information, such as financial or personal data.
- Where to monitor: Identify which services and devices the policy applies to like SharePoint, Teams, or endpoints.
- Conditions for the policy: Define what triggers the policy. Examples include sharing data externally or accessing data from an unmanaged device.
- Actions to take: Decide what happens when the policy is triggered, such as blocking the sharing of information, notifying the user, or sending an alert to administrators.
- Simulate policies before full enforcement: It’s best to simulate DLP policies before fully enforcing them. Simulation mode allows you to see how the policies would work without actually blocking or notifying users. This gives you time to fine-tune the rules and prevent disruptions. Once you’re confident in the results, move to full enforcement.
Best practices for successful DLP policy design
- Start small: Begin with policies that cover critical data and locations. This reduces the risk of over-blocking and allows for gradual fine-tuning.
- Educate users: Use DLP notifications and policy tips to inform users about compliance requirements and risky behaviors. This can reduce false positives and improve policy effectiveness.
- Regularly review and update policies: As your organization grows or regulations change, your DLP policies might need updates. Regular reviews help ensure ongoing compliance and effectiveness.
-
Plan and design DLP policies
Once you understand the importance of protecting sensitive data with data loss prevention (DLP), the next step is to plan and design policies that fit your organization’s needs.
Why careful planning is important
No two organizations are the same, and neither are their data security requirements. When planning for DLP, consider your organization’s specific needs. What kind of sensitive information you handle, where it’s stored, and how it’s shared. A well planned DLP policy prevents accidental data leaks and helps ensure compliance with internal standards without disrupting day-to-day operations.
Steps to plan a DLP deployment
- Identify stakeholders: Planning and implementing DLP requires input from across the organization. This ensures that policies are comprehensive and reflect both legal requirements and business needs. Common stakeholders include:
- IT and security teams
- Compliance officers
- Legal and risk management teams
- Data owners and business unit leaders
- Define categories of sensitive information: Once stakeholders are identified, the next step is to define the categories of data your organization must protect. These categories could include:
- Financial data
- Personal information
- Intellectual property
- Any other sensitive or regulated information
- Set clear goals and strategy: With stakeholders and data categories in place, you can establish your goals. These might include reducing accidental sharing of sensitive data, ensuring compliance, or protecting intellectual property. Align your DLP strategy with your business goals to ensure the policies meet both security and operational requirements.
- Determine where DLP will be applied: DLP policies can be applied across a wide range of platforms. Determine where sensitive information is most likely to be stored, shared, or accessed. Locations include:
- Exchange Online for email
- SharePoint and OneDrive for stored and shared files
- Microsoft Teams for chat and shared documents
- Office applications like Word, Excel, and PowerPoint
- Windows 10, Windows 11, and macOS (latest three versions) for endpoint protection
- Non-Microsoft cloud apps monitored through Microsoft Defender for Cloud Apps
- On-premises file shares and on-premises SharePoint
- Microsoft Fabric and Power BI for data analytics and reporting
- Identify stakeholders: Planning and implementing DLP requires input from across the organization. This ensures that policies are comprehensive and reflect both legal requirements and business needs. Common stakeholders include:
-
Why use Microsoft Purview DLP?
- Prevent accidental data leaks: Mistakes like sending an email to the wrong person or sharing a file publicly by accident can lead to data breaches. DLP policies automatically catch these errors before they happen, protecting sensitive data from being exposed.
- Maintain consistent data security: DLP works across a range of services and platforms, ensuring that no matter where your data is stored or shared, it’s consistently protected. This provides an organization-wide approach to data security without leaving gaps.
- Low effect on productivity: One of the strengths of DLP is that it runs quietly in the background without disrupting users’ workflows. If sensitive data is detected, users receive warnings or alerts, allowing them to correct their actions without slowing down their work.
- Tailored data security: DLP policies can be customized to fit the unique needs of your organization. Whether you need to protect financial data, internal communications, or intellectual property, policies can be created to align with your business priorities and ensure sensitive data is handled appropriately.
- Adaptive Protection in DLP: Adaptive Protection in Microsoft Purview strengthens DLP by dynamically adjusting policies based on user risk levels, as identified through Microsoft Purview Insider Risk Management. When risky behaviors are detected, stricter DLP policies can be automatically applied to higher-risk users, ensuring better protection without over-restricting others. Adaptive Protection policies can be configured manually or automatically generated through quick setup, ensuring your organization’s data security adapts to changing risks in real time.
-
Data loss prevention overview
In any organization, protecting sensitive data from accidental exposure or sharing is essential. This data could include financial records, personal information, or internal business details. Losing control over this data can lead to serious consequences. Microsoft Purview Data Loss Prevention (DLP) helps address this by identifying, monitoring, and safeguarding sensitive information across your organization’s digital environment.
What is Microsoft Purview DLP?
Microsoft Purview Data Loss Prevention (DLP) is a tool that helps prevent accidental sharing of sensitive information by applying policies across various digital environments. These policies detect and respond to specific types of data, such as credit card numbers or personal identification details, ensuring that sensitive information is protected and managed effectively.
-
Govern your data
Governing data is essential for managing information throughout its lifecycle, ensuring compliance, and minimizing risk. Effective governance involves retaining important data only as long as needed and securely deleting it when no longer required. This process helps organizations meet legal standards and reduces the risk associated with storing unnecessary data. To support these efforts, Microsoft Purview provides tools like data lifecycle management and records management. These tools automate retention, manage records, and streamline deletion, helping organizations maintain compliance and protect sensitive information.
Microsoft Purview Data Lifecycle Management
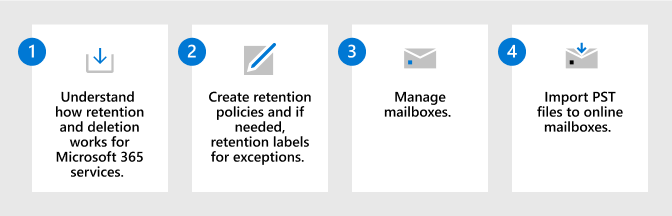
Microsoft Purview Data Lifecycle Management helps manage the lifecycle of content by applying retention and deletion policies to ensure compliance. This process applies to general data, whether stored in mailboxes, SharePoint, or other workloads across Microsoft 365. Here’s a framework for managing your data with data lifecycle management:
- Understand how retention and deletion work for Microsoft 365 services: Before you can manage your data lifecycle, it’s essential to understand how retention and deletion function within the Microsoft 365 ecosystem. Each service, from Exchange mailboxes to SharePoint, might have different retention needs depending on how data is stored and shared.
- Create retention policies and, if needed, retention labels for exceptions: Retention policies allow you to control how long data is kept and when it’s deleted. In cases where more granularity is needed, retention labels provide flexibility by applying unique retention settings to specific content.
- Manage mailboxes: Mailboxes are a critical source of information. Use data lifecycle management policies to apply retention settings that archive or delete mailboxes when necessary. This process ensures that obsolete data doesn’t take up space and is securely removed when no longer needed.
- Import PST files to online mailboxes: By importing PST files into online mailboxes, you ensure that data is governed and protected under Microsoft 365 retention policies, reducing the risk of unmanaged data.
-
Prevent data loss
As organizations manage sensitive data across various platforms, preventing unauthorized access, sharing, or accidental leaks becomes critical. Microsoft Purview Data Loss Prevention (DLP) and endpoint DLP offer comprehensive solutions for safeguarding your sensitive information across devices and applications. This approach helps ensure that sensitive data stays secure, even when users interact with external systems or cloud services.
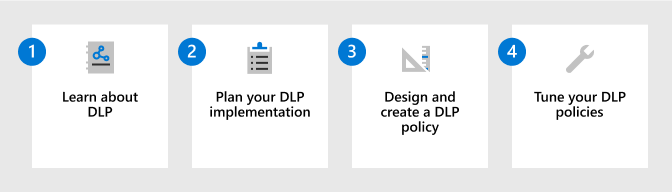
Here’s a framework for effectively preventing data loss:
- Learn about DLP: The first step is understanding how DLP works to safeguard sensitive data. DLP policies are designed to detect when sensitive information, such as personal health data or credit card numbers, is being shared inappropriately, ensuring it’s automatically blocked or restricted when necessary. This foundational knowledge helps you apply the correct policies to prevent data loss across platforms like Exchange, SharePoint, and Teams, ensuring no gaps in coverage.
- Plan your DLP implementation: Once you understand DLP, the next step is planning your implementation. Identify where sensitive data is stored, how it moves across your organization, and which areas need the most protection. Planning in advance allows you to target high-risk areas and apply policies strategically. By aligning DLP policies with the data’s flow, you can ensure effective monitoring without overburdening your users or systems.
- Design and create a DLP policy: With a plan in place, you can now design your DLP policies. These policies allow you to define specific rules that identify, track, and protect sensitive data. For instance, you can configure a policy to block the sharing of sensitive customer data outside the organization. A well-designed policy ensures that sensitive information is automatically protected while enabling employees to work without constant interruptions.
- Tune your DLP policies: Finally, fine-tuning your DLP policies is essential to maintain a balance between security and usability. Review reports from your DLP implementation to identify false positives or areas where adjustments are needed. This tuning process helps you refine your policies to ensure they’re effective without being overly restrictive, allowing your users to remain productive while sensitive data remains secure.