Microsoft has added a new extension to .NET that makes it easy to implement data classification. The Microsoft.Extensions.Compliance.Classification extension enables you to define DataClassification and DataClassificationAttribute properties.
To use the extension in your solution, add the Microsoft.Extensions.Compliance.Redaction NuGet package to your project.
For example the code to create the above taxonomies could look like this:
C#Copy
using Microsoft.Extensions.Compliance.DataClassification;

public static DataClassification EUIIDataClassification {get;} = new DataClassification("EUIIDataTaxonomy", "EUIIData");

public static DataClassification EUPDataClassification {get;} = new DataClassification("EUPDataTaxonomy", "EUPData");

public class EUIIDataAttribute : DataClassificationAttribute
{
    public EUIIDataAttribute() : base(DataClassifications.EUIIDataClassification) { }
}

public class EUPDataAttribute : DataClassificationAttribute
{
    public EUPDataAttribute() : base(DataClassifications.EUPDataClassification) { }
}
With your taxonomies defined, you can now annotate your data types with the appropriate attribute. For example:
C#Copy
public class User
{
    [EUIIData]
    public string Name { get; set; }

    [EUIIData]
    public string Address { get; set; }

    [EUPData]
    public string UserId { get; set; }
}
The first step to implementing compliance in a cloud-native application is to classify the data. Data classification is the process of identifying data your application uses by its sensitivity. Data classification is done by assigning a label to each data type. For example, you might label a user’s name as “sensitive” and a user’s age as “nonsensitive”.
In this unit, you’ll explore some of the compliance features of .NET. Then you’ll learn how to classify data in a cloud-native application.
What is compliance?
Organizations need to comply with their own internal policies and with external regulations. For example, a company might have a policy that says that customer data can’t be stored in a log file. Or a government might have create regulations to enforce the appropriate handling of customers data. These policies and regulations are often referred to as compliance requirements.
Compliance requirements are implemented by creating a set of rules that are applied to an organization’s applications. Usually a compliance team is responsible for implementing compliance rules and then ensuring that they’re followed.
What is data classification?
Data classification is a term used in cybersecurity and information governance. Data classification describes the process of identifying, categorizing, and protecting content according to its sensitivity or impact level. Data classification protects your organizations data from unauthorized disclosure, alteration, or destruction based on how sensitive or impactful it is.
Your company decides to implement a data classification policy. This policy classifies data into two taxonomies:
End User Identifiable Information (EUII) – Information that can be used to identify an individual. For example, a user’s name, address, or phone number.
End User Pseudonymous Identifiers (EUPI) – Information that can be used to identify an individual, but only if data are combined with other information. For example, a user’s ID for their data in a database, or IP address.
You added your API to your web app and they’re both running locally. Now it’s time to publish your API and your app to Azure Static Web Apps.
When you created the Azure Static Web Apps instance and asked it to watch your main branch, a GitHub Action was generated for you. The GitHub Action listens to your repository’s main branch for commits and pull requests. Then when the GitHub Action detects these changes, it builds and publishes your app.
When you created your Azure Static Web Apps resource, you provided the folder location for your API project by accepting the default value of Api. Azure Static Web Apps built and deployed the Azure Functions app in that folder. However, the app didn’t work because the HTTP GET API isn’t created yet.
Trigger the GitHub Action
The GitHub Action is ready to build and publish your web app and API once it detects a change to your main branch. You could either commit directly or create a pull request to the main branch. Both of these changes trigger the GitHub Action. When changes are detected on the main branch, it triggers the GitHub Action to publish the app at the same URL for your live web site.
Now it’s time for you to create an API for your shopping list app.
Azure Functions
One of the greatest benefits of Azure Static Web Apps is that it hosts your web app and an API built with Azure Functions together! Azure Static Web Apps globally distributes your web app’s static assets and hosts your API in Azure Functions. With this setup, you gain the availability and speed that comes with global distribution of your web app assets. What you don’t get is also important.
You don’t need to configure and maintain a full server for your front-end or back-end. This feature is the sweet spot for Azure Static Web Apps: you get the ease of publishing your app and API with minimal configuration and maintenance.
Azure Functions serves your route endpoints, doesn’t require a full back-end server to configure or maintain, and provides automatic scaling out and scaling in based on demand. These features make Azure Functions a great API partner for your shopping list web app that serves static assets.
Azure Static Web Apps generates a unique URL for your site, which you can find on the Overview tab in the portal. The API is available through this same URL by appending /api to the URL.
There’s a client-side route /products in your front-end application that displays a list of products for your shopping list. When you go to /products in your app by selecting the Products link, your browser’s address bar confirms that you’re at /products. When you refresh the browser while on this page, you want the app to refresh and display the products once again. However, without a fallback route, you see a 404 error stating the page can’t be found.
You see a 404 error when you refresh the page because the browser sends a request to the hosting platform to serve /products. However, there’s no page on the server named products to serve.
Fortunately, it’s easy to resolve this issue by creating a fallback route. A fallback route is a route that pairs all unmatched page requests to the server.
Configure a fallback route
Azure Static Web Apps supports custom routing rules defined in an optional staticwebapp.config.json file located in the app’s source folder. You can define a navigation fallback route in the navigationFallback object. A common fallback route configuration looks like this example.
Your ultimate goal is to host your app in Azure. Azure Static Web Apps takes care of provisioning all the necessary Azure resources for you.
However, before your app can be hosted, you need something to build your app as you make changes. Those changes could be via commits or pull requests to your repository. A key feature of Azure Static Web Apps is that it sets up a GitHub Actions workflow to build and publish your application.
When you create the Azure Static Web Apps resource, it creates the GitHub Actions workflow. The workflow is triggered immediately and takes care of building and publishing your app. The workflow is also triggered every time you make a change to the watched branch in your repository.
Azure Static Web Apps
There are two automated aspects to deploying a web app. The first provisions the underlying Azure resources that make up your app. The second is a GitHub Actions workflow that builds and publishes your application.
When you publish your app to the web with Azure Static Web Apps, you’re getting fast hosting of your web app and scalable APIs. You’re also getting a unified build and deployment workflow provided by GitHub Actions.
Now, let’s see how we can deploy our application to App Service.
Automated deployment Automated deployment, or continuous integration, is a process used to push out new features and bug fixes in a fast and repetitive pattern with minimal impact on end users.
Azure supports automated deployment directly from several sources. The following options are available:
Azure Repos: You can push your code to Azure Repos, build your code in the cloud, run the tests, generate a release from the code, and finally push your code to an Azure Web App. GitHub: Azure supports automated deployment directly from GitHub. When you connect your GitHub repository to Azure for automated deployment, any changes you push to your production branch on GitHub are automatically deployed for you. Bitbucket: Due to its similarities to GitHub, you can configure an automated deployment with Bitbucket.
In this unit, you learn how to create an Azure App Service web app using the Azure portal.
Why use the Azure portal?
The first step in hosting your web application is to create a web app (an Azure App Service app) inside your Azure subscription.
There are several ways you can create a web app. You can use the Azure portal, the Azure Command Line Interface (CLI), a script, or an integrated development environment (IDE) like Visual Studio.
The information in this unit discusses how to use the Azure portal to create a web app, and you use this information to create a web app in the next exercise. For this module, we demonstrate using the Azure portal because it’s a graphical experience, which makes it a great learning tool. The portal helps you discover available features, add other resources, and customize existing resources.
What is Azure App Service?
Azure App Service is a fully managed web application hosting platform. This platform as a service (PaaS) offered by Azure allows you to focus on designing and building your app while Azure takes care of the infrastructure to run and scale your applications.
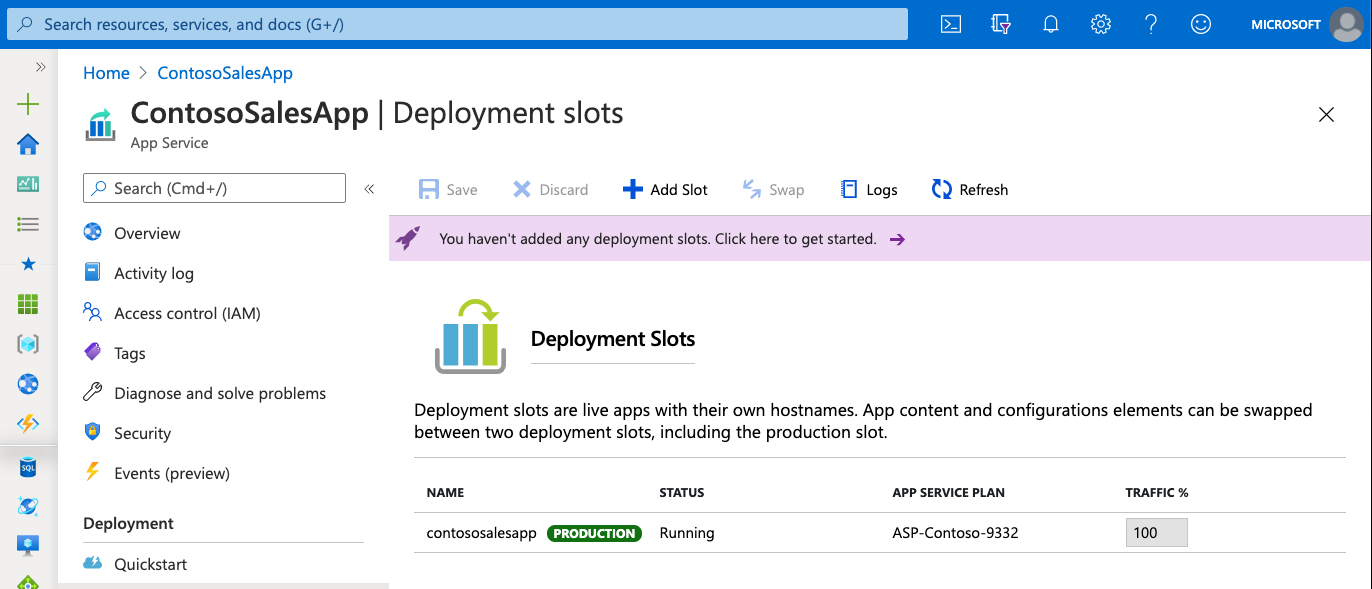
Deployment slots
Using the Azure portal, you can easily add deployment slots to an App Service web app. For instance, you can create a staging deployment slot where you can push your code to test on Azure. Once you’re happy with your code, you can easily swap the staging deployment slot with the production slot. All it takes is a few mouse clicks in the Azure portal.
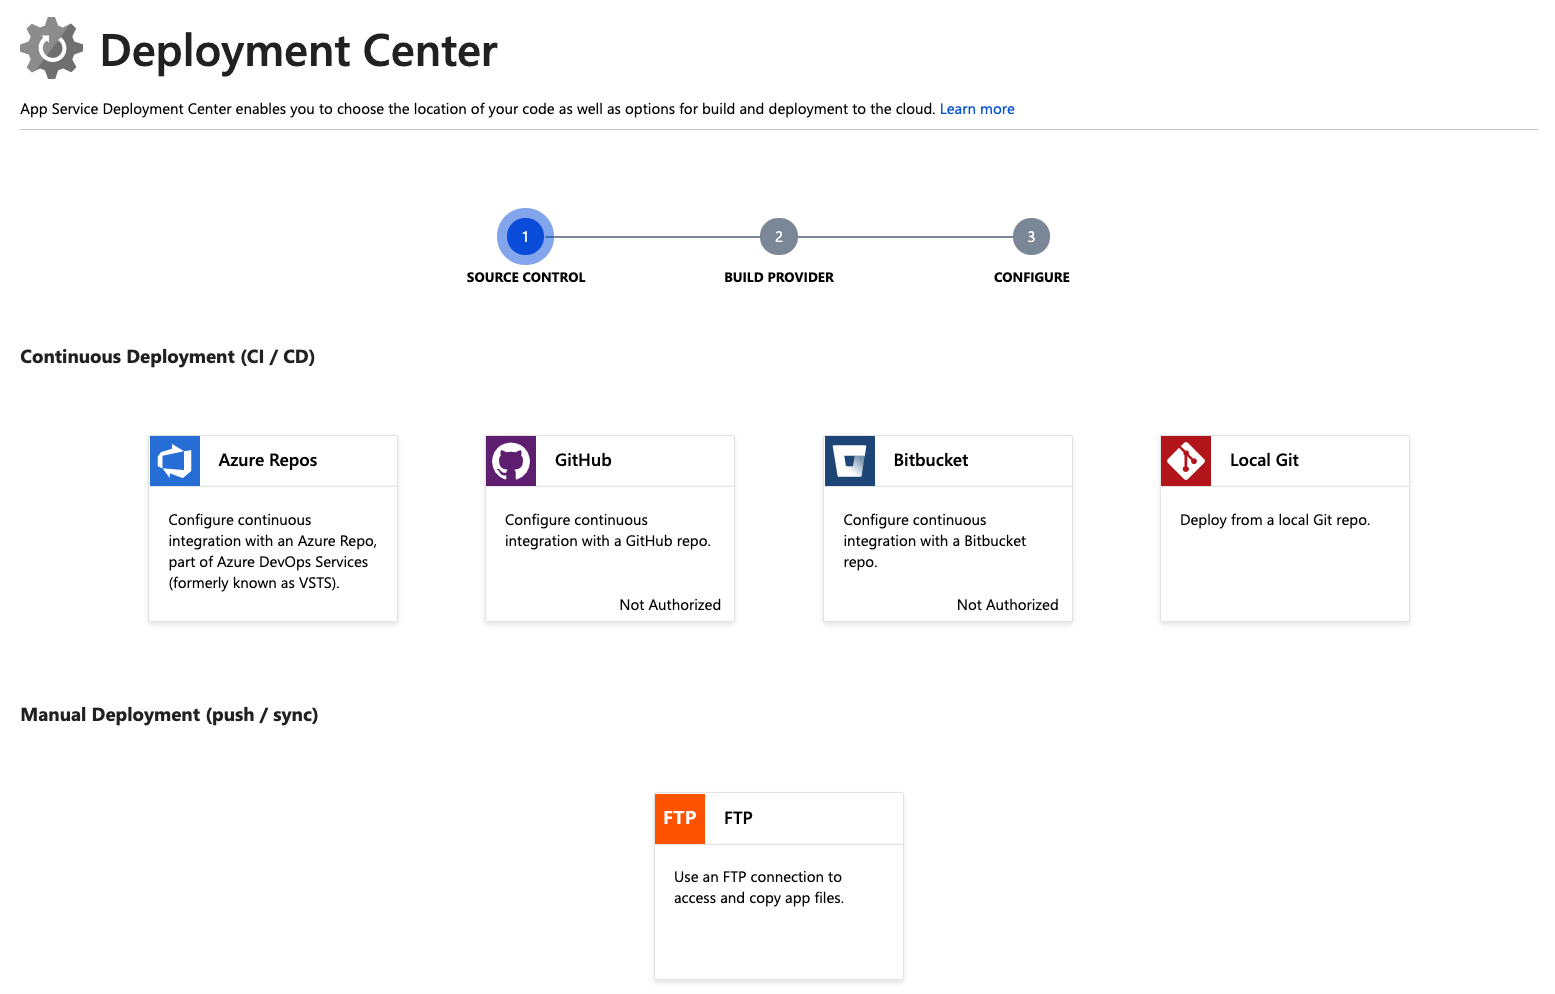
Continuous integration/deployment support
The Azure portal provides out-of-the-box continuous integration and deployment with Azure Repos, GitHub, Bitbucket, FTP, or a local Git repository on your development machine. You can connect your web app with any of the preceding sources, and App Service does the rest for you. It automatically syncs your code and any future changes on the code into the web app. Furthermore, with Azure Repos, you can define your own build and release process. A full process that compiles your source code, runs the tests, builds a release, and finally deploys the release into your web app every time you commit the code. All that happens implicitly, without any need for you to intervene.
Integrated Visual Studio publishing and FTP publishing
In addition to being able to set up continuous integration/deployment for your web app, you can always benefit from the tight integration with Visual Studio to publish your web app to Azure via Web Deploy technology. App Service also supports FTP-based publishing for more traditional workflows.
Built-in autoscale support (automatic scale-out based on real-world load)
The ability to scale up/down or scale out is baked into the web app. Depending on the web app’s usage, you can scale your app up/down by increasing/decreasing the resources of the underlying machine that’s hosting your web app. Resources can be the number of cores or the amount of RAM available. On the other hand, you can scale out your app by increasing the number of machine instances that are running your web app.In this unit, you learn how to create an Azure App Service web app using the Azure portal.
Why use the Azure portal?
The first step in hosting your web application is to create a web app (an Azure App Service app) inside your Azure subscription.
There are several ways you can create a web app. You can use the Azure portal, the Azure Command Line Interface (CLI), a script, or an integrated development environment (IDE) like Visual Studio.
The information in this unit discusses how to use the Azure portal to create a web app, and you use this information to create a web app in the next exercise. For this module, we demonstrate using the Azure portal because it’s a graphical experience, which makes it a great learning tool. The portal helps you discover available features, add other resources, and customize existing resources.
What is Azure App Service?
Azure App Service is a fully managed web application hosting platform. This platform as a service (PaaS) offered by Azure allows you to focus on designing and building your app while Azure takes care of the infrastructure to run and scale your applications.
Deployment slots
Using the Azure portal, you can easily add deployment slots to an App Service web app. For instance, you can create a staging deployment slot where you can push your code to test on Azure. Once you’re happy with your code, you can easily swap the staging deployment slot with the production slot. All it takes is a few mouse clicks in the Azure portal.
Continuous integration/deployment support
The Azure portal provides out-of-the-box continuous integration and deployment with Azure Repos, GitHub, Bitbucket, FTP, or a local Git repository on your development machine. You can connect your web app with any of the preceding sources, and App Service does the rest for you. It automatically syncs your code and any future changes on the code into the web app. Furthermore, with Azure Repos, you can define your own build and release process. A full process that compiles your source code, runs the tests, builds a release, and finally deploys the release into your web app every time you commit the code. All that happens implicitly, without any need for you to intervene.
Integrated Visual Studio publishing and FTP publishing
In addition to being able to set up continuous integration/deployment for your web app, you can always benefit from the tight integration with Visual Studio to publish your web app to Azure via Web Deploy technology. App Service also supports FTP-based publishing for more traditional workflows.
Built-in autoscale support (automatic scale-out based on real-world load)
The ability to scale up/down or scale out is baked into the web app. Depending on the web app’s usage, you can scale your app up/down by increasing/decreasing the resources of the underlying machine that’s hosting your web app. Resources can be the number of cores or the amount of RAM available. On the other hand, you can scale out your app by increasing the number of machine instances that are running your web app.
Imagine you’re an employee of a pizza company named Contoso Pizza. Your team maintains an internal application that’s written in ASP.NET MVC 5 and running on .NET Framework 4.8. Your manager has asked you to evaluate whether you should upgrade the application to ASP.NET Core.
We discussed screen readers briefly in the “Accessibility and screen readers” unit. A screen reader does what the name implies: it reads the screen to you. Plus, it provides audible cues, context, and control to move through and interact with web applications and complex content.