One of the most important ways that users interact with web applications is by using forms to submit information. There are several important considerations in how you write your forms to make sure all of your users can move through, fill in, and submit them.
The fundamental concept is to use HTML the way it was designed. Standard HTML form elements are built for accessibility, but it’s easy to unconsciously override accessibility features with the latest JavaScript library or overly clever CSS.
Labels
Every input tag on your forms should have an associated <label> tag to identify it. This tag is different from just putting some text on the screen next to the input element, because labels are programmatically associated with the input elements. For example, screen readers read the label text when the input element has focus.
Selecting a label activates the input and makes interaction easier. It also helps users with touchscreen devices. Instead of looking for a tiny checkbox on a phone, users can just select the label.
Here’s an example of an input text field with an associated label:
HTMLCopy
<label for="name">Name</label>
<input type="text" id="name">
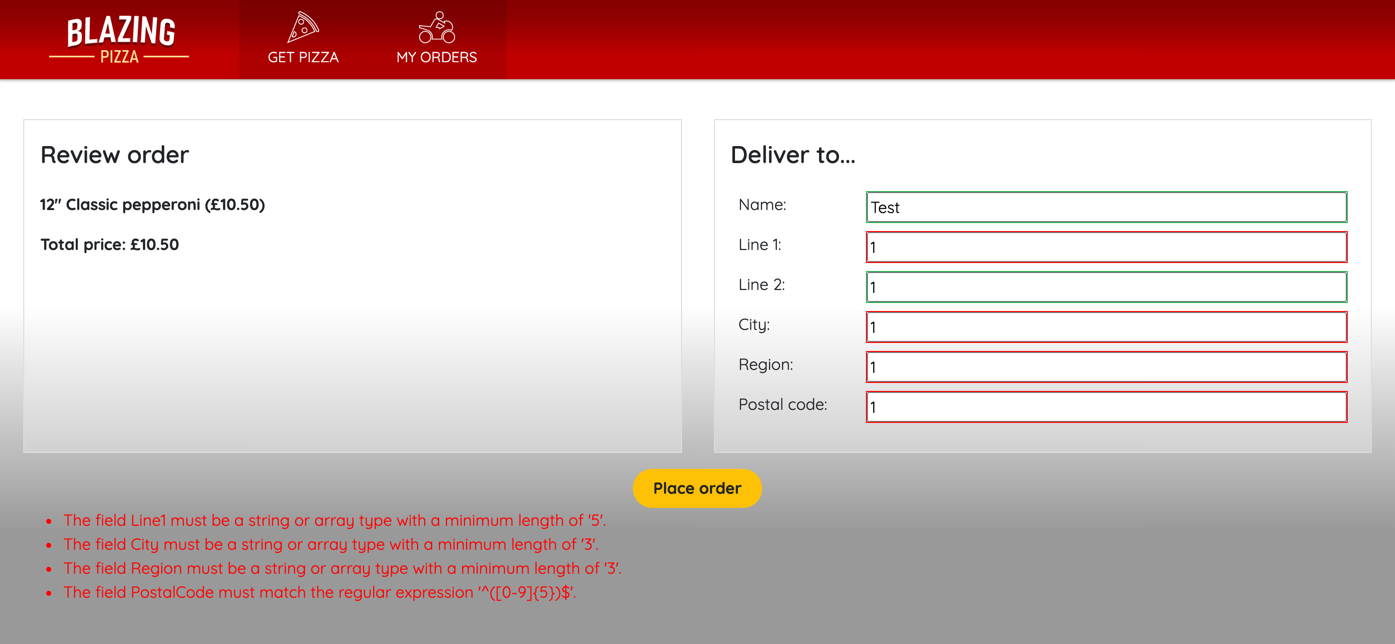
Validation and error messages
Required fields
Let’s start with the simplest case: required fields. Rather than indicating these fields by using color coding or other custom UI elements, you can use the required attribute on the HTML input element. Screen readers can handle this attribute, and users on any browser see the required field interaction by using the standard UI for their platform.
HTMLCopy
<input type="text" id="name" required>
If you want to include more visual design for required elements, you can use the CSS pseudo-selector. It’s fine to provide other styling, but using the required attribute provides accessible indication to all users. The following CSS style sets the border color for required text boxes to red:
cssCopy
input:required
{
  border-color: red;
}
HTML form elements offer comprehensive validation support for common input types. Rather than using custom JavaScript and HTML to show a date picker, for instance, you can just use this code:
HTMLCopy
<input type="date" id="birthday">
This code provides a native date picker pop-up for the user’s browser and operating system. The date picker is tested for accessibility and it handles validation for you. There’s broad support for input types that used to require custom Regex validation, UI elements, and JavaScript:
- Email
- Date
- Month
- Week
- Time
- Range
- URL
- Color
So now you can write less code and it’s more accessible. It’s a win-win!
Tab order
Users who move through your form by using a keyboard or screen reader rely on tab order. It works unless you have a complicated form design or are trying to do something too fancy. It’s hard to mess up tab order for most forms. However, it’s an important feature to test.
You can test tab order by selecting the Tab key on your keyboard and checking the interaction. However, as we see in the next exercise, Accessibility Insights for Web can make this testing a lot easier.
agile project management certification training courses malaysia